
Watson Discovery: Creating and Populating a Collection
Ingestion, crawlers, and connectors
Photo by Mark Fletcher-Brown on Unsplash
Disclaimer: This is my own work and does not represent the viewpoint of my present employer or any past employer.
Back to Table of Contents
In this chapter, we will talk about getting documents into Watson Discovery.
Ingestion
Ingestion is the process of taking documents into the system in order to build a searchable collection.
When you create your collection, you select the data source and method used to populate the collection. Once the collection has been created, the method and data source cannot be changed.
This means that there is a one-to-one relationship between collections and data sources.
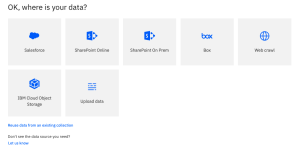
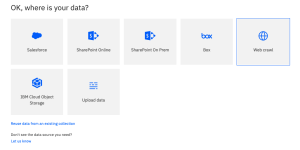
This screenshot shows the data sources currently available for Plus-type accounts.
There are several ways to ingest documents into your collection:
- Uploading documents using the web-based Tooling (User Interface).
- Creating and running one of the built-in crawlers or connectors.
- Developing and running a custom crawler using the Discovery API (requires coding).
- Reusing data from an existing collection.
Let’s look at each of these in more detail.
Uploading Documents
Uploading is the best way to get documents from your laptop or workstation into Discovery on the cloud.
If you select to create a collection from uploaded documents, you will see a form for naming the collection and setting the language, etc. This form will be similar for all collections you create.
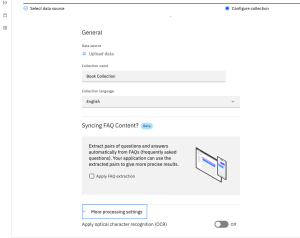
If you check the box marked Apply FAQ extraction, Discovery will scan the document for question-answer pairs and attempt to detect question/answer pairs in the documents and apply extraction for them. As of this writing, FAQ extraction is a Beta feature of Discovery.
To find question/answer pairs, they need to be consistent in format. The questions need to end with a question mark, and the answers need to be grouped immediately following the questions they answer.
Each question/answer pair is stored in a separate document. The extracted question is placed in the title field, and the corresponding answer is placed in the text field.
If you select Apply Optical Recognition (OCR), Discovery will extract text found in the images contained in your documents. Keep in mind that ingestion will be slower with OCR enabled. You may need to open the More processing settings section of the form to see the OCR selector switch.
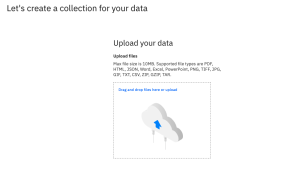
Once you have submitted the Collection Creation form, you will be presented with a form for uploading your files. You can either drag and drop files into the target box or click on the link to select files from your local computer.
When you are finished, click the Finish button in the lower right of your browser. The system will continue to load and ingest the documents you have selected, and you will be placed in the Activity tab of the Manage Collections area of your project.
You can modify the original settings in the Processing settings tab, and you can upload additional data by clicking on the arrow in the Upload data panel.
For uploaded files, there is a 10MB file size limit. If you have files larger than the limit, those files will be ignored.
And there is a limit of 200 files for each upload session.
Built-in Crawlers and Connectors
The data sources with available connectors for Plus plans are currently:
- Salesforce
- Sharepoint (On-premises and Online)
- Box
- IBM Cloud Object Store (COS)
- Web
Let’s look at the web crawler since it doesn’t require access to a licensed repository. Keep in mind that each of the other connectors will have configuration parameters specific to the repository type.

When you select Web crawl as your data source, you are taken to the initial configuration screen for the web crawler.
The first few parameters (Collection Name and Language) are the same as for other data sources.
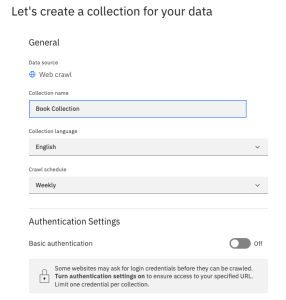
Enter a unique name for your collection, then select a frequency for crawling your data. The available options are:
- Hourly
- Daily
- Weekly
- Monthly
The frequency determines how often Discovery will check the website(s) for updates and additions. Each time the crawler runs, it will do a fresh crawl and update the collection with pages that have been changed and added since the last crawl.
Note that the web crawler does not delete pages when they are removed from the website.
If your website is password-protected, you can enter the authentication information in the next step.
If you want to crawl password-protected sites, you will need credentials to access that site. You should also check the policy for that site to ensure that the information you are making searchable in your collection can be shown or released to the users of your Discovery system.
If you need to crawl several sites with different credentials, you will need to create separate collections for each of these.
Next, we come to the site-specific configuration settings. They are relatively simple:


The web crawler takes a seed (starting point) URL, downloads the HTML page, ingests it, and extracts the HTML links to discover pages linked to it, marking the current page as crawled. The crawler then recursively visits each linked page and follows the same process for each page, keeping track of which pages have been crawled so that it doesn’t duplicate the ingested pages. In this manner, an entire website could theoretically be crawled.
You can configure a list of multiple Starting URLs for various sites or multiple parts of a site. When you add a URL, you can get to the configuration for each Starting URL by clicking the pencil icon next to it. Clicking the pencil displays the configuration editor.
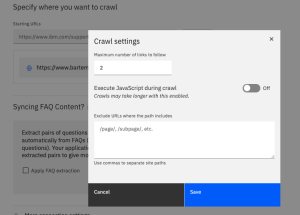

The parameters you can change or enter are:
- Maximum number of links to follow: this is the “depth” of the crawl. You can set it to zero if you don’t want to follow the links. For numbers greater than zero, ALL of the links on a page are processed, and those matching the patterns defined in the Exclude URLs are removed from the list. If any links remain, they are followed to retrieve the linked pages (depth 1). Then, the new pages are each processed similarly, and the links for each of these pages that remain after filtering are followed to retrieve the linked pages (depth 2), and so on, until the Maximum number of links to follow value is reached or until there are no more links to crawl, whichever comes first. The default for this parameter is 2.
- Execute JavaScript during crawl: when a page is processed, Discovery will attempt to evaluate any JavaScript in the page to extract content rendered by the script (HTML or text). If the entire page is dynamically generated, Discovery won’t be able to crawl it. The online documentation for Discovery states:
“The web crawler can crawl dynamic websites that use JavaScript to render content, but cannot crawl sites that use dynamic URLs. If you can’t see any content when you view the source code of a web page in your browser, then the service cannot crawl it.”
- Exclude URLs where the path includes: if you have sections of the website you don’t want crawled, enter a list of the patterns for those pages here. Exclusions help to focus the crawl on getting only the content you want from the site. The list of exclusions applies only to the site for the Starting URL you are currently editing.
Apply FAQ Extraction and Apply Optical Character Recognition work in the same manner as uploading content.
In crawling a website, the web crawler follows some basic rules:
- Links to other websites are not followed automatically. If you want other websites crawled, you will need to add Starting URL links for each website. In some cases, as when the authentication credentials are different, it may make sense to put them into separate collections of the same project.
- Robots directives are honored. The crawler looks at the robots.txt file if present on the site and the Meta tags on each page. If the page is excluded for any reason, it is not processed or ingested.
- The web crawler does not delete content when it disappears from the website.
Please see the online documentation for crawler limits.
Custom Crawlers
If your data is in a repository for which Discovery does not have a connector, and using alternative methods like uploading is impractical or not possible. You may need to build a custom crawler using Discovery’s API to push documents into Discovery.
Reusing Content from Other Collections
You can choose to share data between collections, and these collections can be in separate projects. To use data from another collection, click on the Reuse data from an existing collection link below the data source icons when creating a collection.
Reusing data from an existing collection does not create a copy of the current data. Both data and connector configurations are shared between collections. Be careful in making changes because what you do to one collection will affect all other collections sharing the same data and connector.
Summary
In this chapter, we discussed four ways to ingest data into a collection and also learned that the ingestion method or connector is configured when a collection is first created. Once set, it cannot be changed. An exception to this is that documents can always be added to any collection programmatically, using the Discovery API. We will look at the API in a future chapter.
In the several following chapters, we will explore how to identify fields and split large documents using Smart Document Understanding and apply enrichments to identify and extract various objects in a document.
(The next chapter will be linked when published.)